A normal knowledge of Laravel and ReactJS is needed to follow this tutorial guide.
Laravel makes it simple and easy to develop modern and quick
applications with real-time interactions by giving an event broadcasting system
which permits developers to share the same event names between both the
server-side code and the client-side JavaScript application.
For the development of scalable real-time applications, Pusher
is an easy, simple, and reliable platform. Pusher is getting support provided by
Laravel, which helps to make a real-time application using both Pusher and Laravel
seamless. In fact, Pusher has become one of the preferred tools for Laravel Community
to make apps in real-time.
In this post, we will see how we can build a chat application with Laravel and Pusher.
We will be using ReactJS as our JavaScript framework, although you can use any
JavaScript framework of your choice or even jQuery and vanilla JavaScript.
Before we start, let's take a quick look at how our application
will look.
YouTube Video Here
The source code of the chat
application is available on GitHub.
Setting Up with New Laravel
To develop this application, we will start by creating new Laravel
project. There are multiple ways to create a new Laravel project, I normally use
the Laravel installer. Open your command prompt or terminal and run the code
below:
laravel new chat-app
This command will create a chat-chat project within
the directory where you execute the above command.
Using
of Laravel event broadcasting requires to register the App\Providers\BroadcastServiceProvider. Open config/app.php and uncomment the
following line in the providers array.
//
App\Providers\BroadcastServiceProvider
We
need to update Laravel that we are using the Pusher driver in the .env file:
BROADCAST_DRIVER=pusher
To use pusher in Laravel project we need to install the
Pusher PHP SDK. We can install Pusher by using this using composer:
composer require
pusher/pusher-php-server
When the installation is completed, we need to add Pusher
app credentials in .env file that will configure credentials to config/broadcasting.php. Pusher account is required in order to get Pusher app
credential.
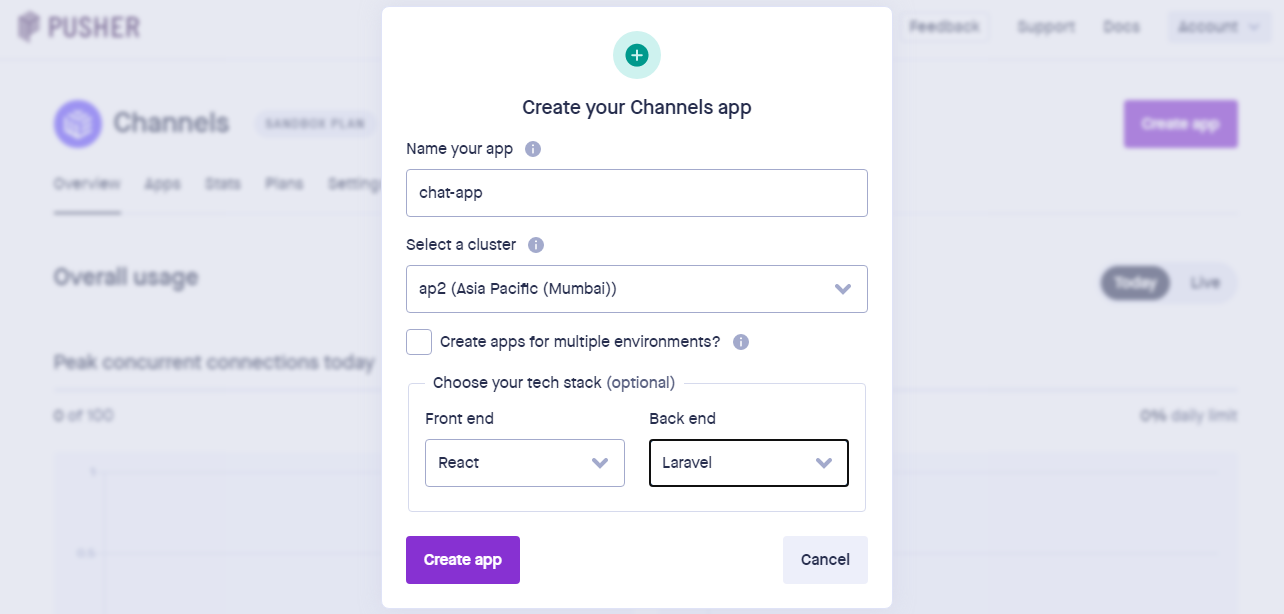
Setting Up Pusher
Just
visit Pusher website and create a free account at https://pusher.com/signup then
login to your dashboard and create an app by following these steps.
1.
Click
on Create App

2.
Type
App Name and set front end as React and backend as Laravel.
3.
Click
on App Keys in the left menu bar

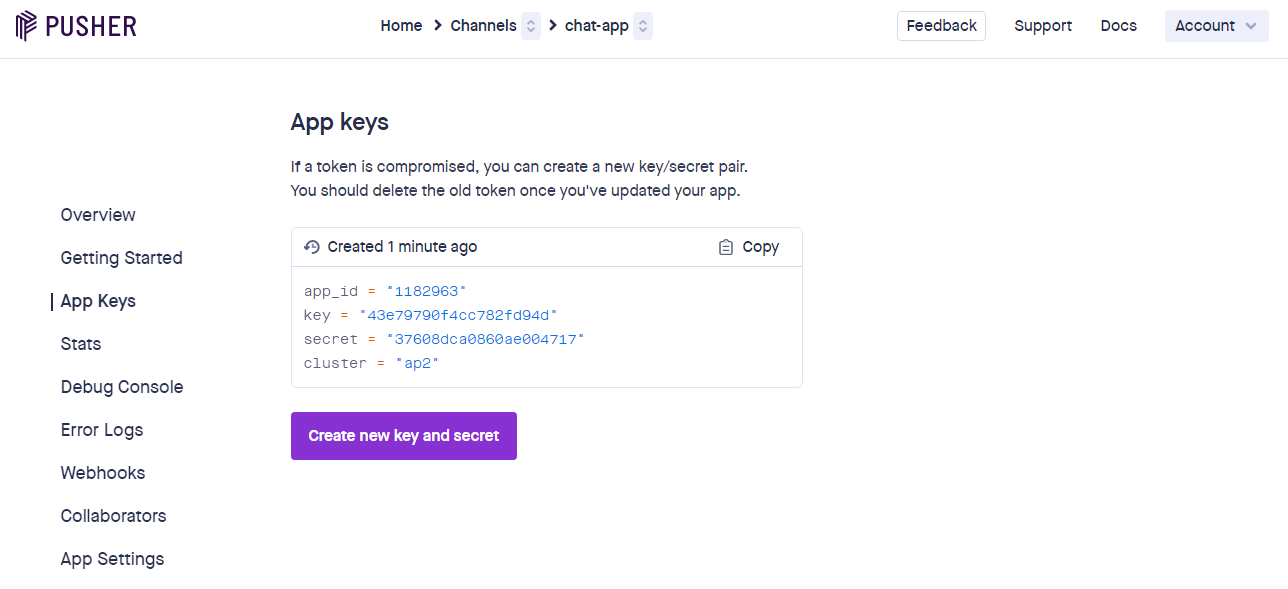
4.
Copy only values and paste in.env file
PUSHER_APP_ID=xxxx
PUSHER_APP_KEY=xxx
PUSHER_APP_SECRET=xxx
PUSHER_APP_CLUSTER=xxx
Keep
in mind that you need to replace xs with your Pusher app
credentials.
We are also going
to use Laravel Mix, which is a wrapper around Webpack that will help us compile
our CSS and JavaScript.
But
first, we need to install these dependencies through NPM:
npm install
For
subscribing and listening to events, Laravel has Laravel Echo package, which is one
of JavaScript library that helps to subscribe a channel and listen for events
that are being broadcast by Laravel. With this library, we will also need to
install Pusher JavaScript library:
npm install --save laravel-echo pusher-js
Once
installed, we need to tell Laravel Echo to use Pusher. At the bottom of the resources/js/bootstrap.js file just
uncomment the Laravel Echo section:
// import Echo from 'laravel-echo';
// window.Pusher = require('pusher-js');
// window.Echo = new Echo({
// broadcaster: 'pusher',
// key: process.env.MIX_PUSHER_APP_KEY,
// cluster: process.env.MIX_PUSHER_APP_CLUSTER,
// forceTLS: true
// });
It will look like this.
import Echo from 'laravel-echo';
window.Pusher = require('pusher-js');
window.Echo = new Echo({
broadcaster: 'pusher',
key: process.env.MIX_PUSHER_APP_KEY,
cluster: process.env.MIX_PUSHER_APP_CLUSTER,
forceTLS: true
});
We have
successfully configured Laravel and pusher integration, now it is time to build
this awesome chat application. Let’s begin this.
To start
chat between two user authentications is required. So, we need an
authentication system, that is easy with Laravel by simply executing an artisan command in the terminal:
composer require laravel/breeze --dev
php artisan breeze:install
npm install
& npm run dev
This will
create the necessary routes, views, and controllers needed for an authentication
system. Don’t forget to run npm install & npm run dev again.
To
create users, we need to execute the users migration that are
available with a fresh installation of Laravel. But to do this, we first need
to set up our database. Open the .env file and enter
your database details:
DB_CONNECTION=mysql
DB_HOST=127.0.0.1
DB_PORT=3306
DB_DATABASE=chat
DB_USERNAME=root
DB_PASSWORD=
Update database credentials and run migration command:
php artisan migrate
Model and Migration (Message)
We
can create Message model and messages migration files by running
the following command:
php artisan make:model Message -m
Message the model will look like this
<?php
namespace App\Models;
use Illuminate\Database\Eloquent\Factories\HasFactory;
use Illuminate\Database\Eloquent\Model;
class Message extends Model
{
use HasFactory;
protected $fillable = ['sender_id','receiver_id','message'];
}
Message
migration will look like this
<?php
use Illuminate\Database\Migrations\Migration;
use Illuminate\Database\Schema\Blueprint;
use Illuminate\Support\Facades\Schema;
class CreateMessagesTable extends Migration
{
/**
* Run the migrations.
*
* @return void
*/
public function up()
{
Schema::create('messages', function (Blueprint $table) {
$table->id();
$table->unsignedBigInteger('sender_id');
$table->foreign('sender_id')->references('id')->on("users")->onDelete("cascade");
$table->unsignedBigInteger(receiver_id');
$table->foreign(receiver_id')->references('id')->on("users")->onDelete("cascade");
$table->boolean('seen')->default(false);
$table->text('message');
$table->timestamps();
});
}
/**
* Reverse the migrations.
*
* @return void
*/
public function down()
{
Schema::dropIfExists('messages');
}
}
The messages migration will have six
columns: an auto-increment id, sender_id, receiver_id, message, seen, created_at and updated_at. The sender_id the column will hold the ID of the sender user
and the receiver_id column
will hold the ID of the receiver user that will receive a message and the message the column will hold the actual message that was
sent by sender user. Run the migration:
php artisan migrate
Message Relationship with User
A relationship is required between the message model, sender, and receiver user model. A user can send or receive many messages while a
particular message was sent or received by a single user. So, the relationship
between the sender user and message is one to many relationships, and also
between the receiver user and the message is one to many relationships. Add the following
code to User the model:
<?php
namespace App\Models;
use Illuminate\Contracts\Auth\MustVerifyEmail;
use Illuminate\Database\Eloquent\Factories\HasFactory;
use Illuminate\Database\Eloquent\SoftDeletes;
use Illuminate\Foundation\Auth\User as Authenticatable;
use Illuminate\Notifications\Notifiable;
use Spatie\Permission\Traits\HasRoles;
class User extends Authenticatable
{
use HasFactory, Notifiable, HasRoles, SoftDeletes;
/**
* The attributes that are mass assignable.
*
* @var array
*/
protected $fillable = [
'name',
'email',
'password',
];
/**
* The attributes that should be hidden for arrays.
*
* @var array
*/
protected $hidden = [
'password',
'remember_token',
];
/**
* The attributes that should be cast to native types.
*
* @var array
*/
protected $casts = [
'email_verified_at' => 'datetime',
];
public function sent_messages()
{
return $this->hasMany(Message::class, 'sender_id', 'id');
}
public function received_messages()
{
return $this->hasMany(Message::class, 'receiver_id', 'id');
}
}
We will also define the reverse relationship by writing
following code in Message model.
<?php
namespace App\Models;
use Illuminate\Database\Eloquent\Factories\HasFactory;
use Illuminate\Database\Eloquent\Model;
class Message extends Model
{
use HasFactory;
public function sender()
{
return $this->belongsTo(User::class, 'sender_id', 'id');
}
public function receiver()
{
return $this->belongsTo(User::class, 'receiver_id', 'id');
}
}